
Remote photoshoot howto
In this post, I will describe all the remote photoshooting techniques that I used in April and May 2020 during the pandemic. Some of them are no longer relevant, but they are still quite elegant solutions that use only the standard OS tools. The methods are arranged in the order of complexity of implementation increase and the image quality improvement.
To get the sense of a real shooting, use the rear camera of your smartphone and ask to turn away the computer screen so that the models do not see their own image and it does not confuse them — then they will respond better to the instructions given by the photographer.
1. Screenshots of the video call
Software: Facetime, Zoom, Skype, Hangouts, Whatsapp, etc...
The first and easiest way is to make a video call in any app (Facetime, Zoom, Skype) and take screenshots. I saw some photographers shoot their screen with a camera (sometimes even a large-format one) (see, for example, here), but I am too modest to do it myself. Make sure you use the rear camera of the smartphone, so that the process for a model differs from regular selfie taking.
+ you can do this on any device
+ no problems with trust and security
– the quality is not so decent and very much depends on the connection speed
1a. Live photo in Facetime
Software: Facetime
It is pretty similar to taking a screenshot – the Facetime app has a take live photo button – it takes a screenshot and saves a photo and a short video.
+ the quality is less dependent on the connection speed
+ no problems with trust and security
– the resolution is very small
– iPhone only
2. CLOS app (iPhone only)
Software: CLOS
The method is also simple, but it appeared when the app was released in late April / early May, so this list will mention the methods that preceded its release. CLOS gives you an access to the camera release button on the iPhone of the person you are connected to via video link. Only the button and a slight auto-exposure selection point control – you can’t review the captured photos on the fly. Still, this is such a huge step up in the quality that it is weird that one app of a kind appeared and only for iOS
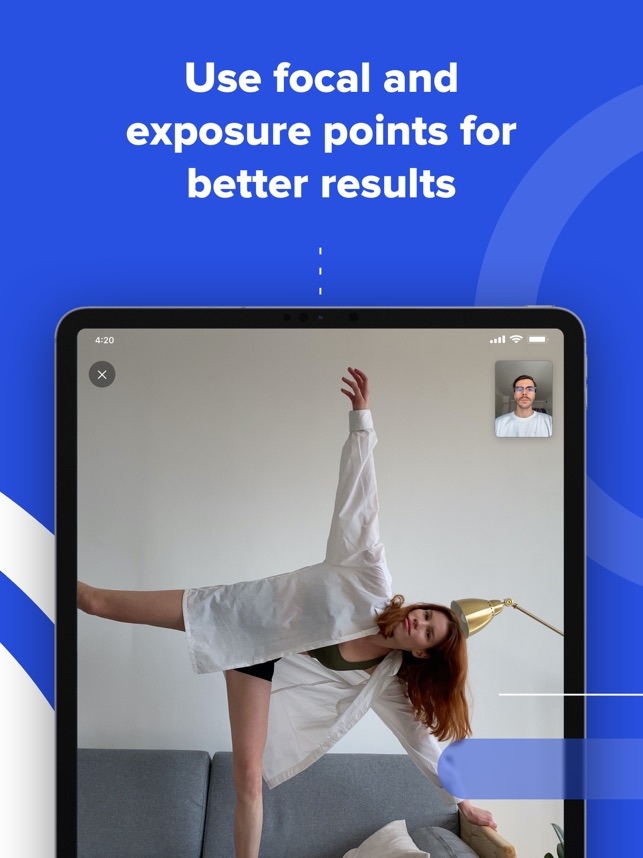
Figure 1. Screenshot of the CLOS app
+ photo quality does not depend on the connection speed
+ the quality is the same as when shooting on an iPhone in person
+ no problems with trust and security
– only for iPhone
– photos remain on the model’s side
3. Vysor App (Android only)
Software: Vysor + Remote Desktop, etc...
For Android smartphones, there is an app called Vysor, which is designed to control a device with a broken screen. The app is launched on a PC/Mac, the smartphone is connected via cable, and its screen becomes available on the computer, both for viewing and for managing. If you connect to model’s computer via anyRemote Desktop control app, you can operate their smartphone, and therefore its camera. The quality is the same as if the photos were taken on this smartphone (that is, sometimes not worse than on the iPhone).
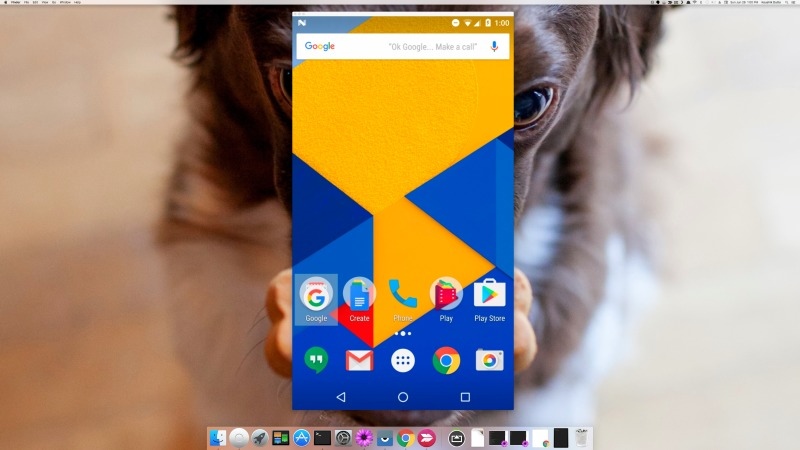
Figure 2. Manage your smartphone using the Vysor app
+ photo quality does not depend on the connection speed
+ the quality is the same as when shooting on a smartphone in person
– You need a computer
– the model must trust the photographer or create a special empty account
– only for Android
– photos remain on the model’s side
4. DSLR/Mirrorless camera Control.
Software: camera software + Remote Desktop, etc...
It turns out that even not all photographers know that most cameras can be controlled remotely from a computer. In normal life, this mode (tethered shooting) is used when a big team are responsible for creating a photo, for example, when shooting fashion, or when using a long shutter speed (product and still-lifes) — the camera screen is displayed on the computer and the shutter button and some camera controls are also available .
The ease of use and installation of the program depends on the manufacturer. I managed to shoot with Canon (the most frequent-and the easiest option), Nikon (everything is a little more complicated), Sony (also everything is simple) and Fuji (an unfriendly company, but there is a solution).
To control cameras of different brands, you can download these free programs:
Canon: Canon EOS Utility Win/OSX/Linux
Canon has software even for Linux, works even with quite ancient cameras (I shot with 5DmII and 450D), allows you to set all camera settings, except for the shooting mode itself, even the focus can be set manually. Thank you, comrades from Canon. Perfect job. Love you. (never owned Canon though).
Nikon: DigiCamControl Win / Sofortbild OSX
Nikon somehow did not work out its own software, well, but there are an opensource solutions. Allows you to change the main settings, but only works in auto focus mode, no lens .
Sony: Imaging Edge Desktop Win/OSX
Sony is almost like Canon, but there is no focus control.
Fuji: no separate and free app, only a plugin for Lightroom for $80 =( This is quite funny, but Fuji sells a plug-in for a paid program for money to people who purchased their camera.
But Capture One Pro (not a free software, £20 per month or £299 per version) allows you to control all the above (and maybe more) cameras, including Fuji.
Then, as in the method described above, photographer connects to the model’s computer via any Remote Desktop management application and controls the camera, directing the model with his voice. The feeling of moving something on the other side of the Earth is indescribable. The quality of photos is the same as if they are taken in person. Don’t forget to turn the screen away from the model, or dim its brightness, so that the model won’t see themselves.
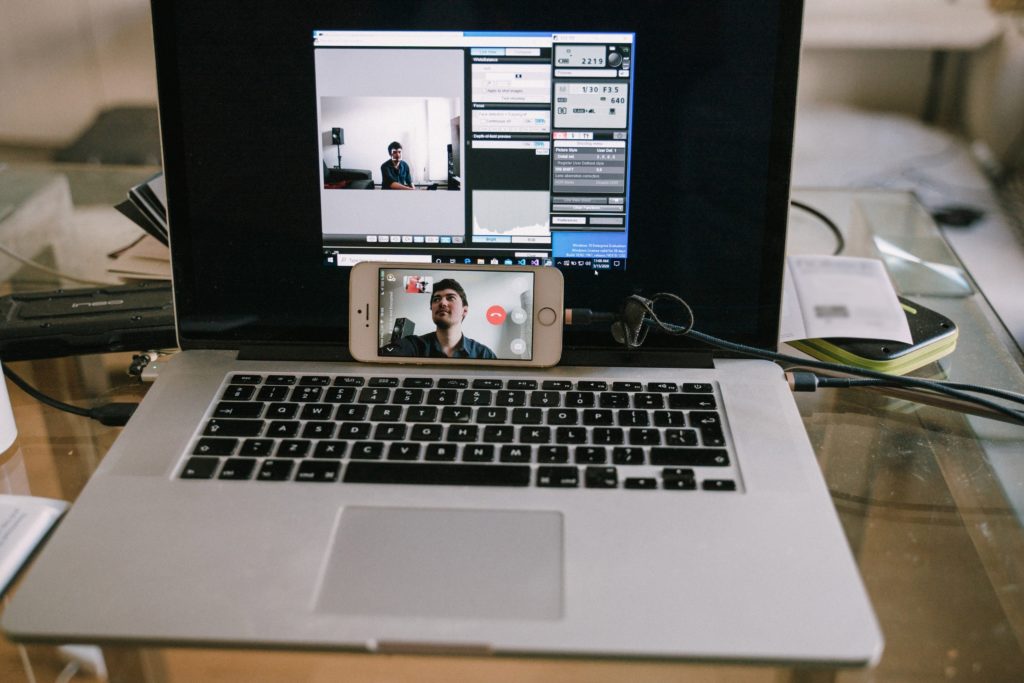
Fig. 3. Backstage of the remotely operated camera shooting.
+ photo quality does not depend on the connection speed
+ professional quality photos (depends on the camera)
– model should have a computer
– requires a camera on a model side
– the model must trust the photographer or create a special empty account on the computer
– photos remain on the model side
Conclusion:
I hope this description is detailed enough to help those who want to shoot where they can’t get to right now. Within my project, I have conducted more than 70 shootings in more than 50 cities in 34 countries in all five ways described here.
Share this guide, take more pictures, take picture where you are not yet and where you can’t go right now.
Written by Andy Go
PS:
5. Remote iPhone management
Software: Nothing is needed, everything is built into OSX
This method is no longer relevant, but since it was very fun and interesting to discover it, and — moreover — it uses standard OSX tools, I will tell you about it anyway. Access to the computer, as in previous cases, can be obtained through remote desktop access programs.
If iPhone is connected with a cable to a Mac computer, Quick Time can be used to view the iPhone screen. To do this, click on New Movie Recording and then select iPhone in the list of devices. Its screen will appear in the quicktime window.


